

Business owners today must prioritize getting their businesses found online. Bing Places is one of the best tools to help them accomplish this. The Bing-powered listing helps local businesses attract new clients by easily and conveniently displaying their information when a potential customer searches online for any goods or services the business provides.
![Epic Guide to Local SEO Download [ad]](https://www.advicelocal.com/images/epic-guide-local-SEO-download-cta.png)
While claiming, creating and optimizing a listing on Bing Places might sound easy, the process comes with its own set of challenges. Fortunately, we have an experienced team of specialists at Advice Local that help businesses get found online every day – not only on Bing Places but on many other listings and data aggregators on our Data Amplifier Network. If you’d like to see just how they do it, request a demo today!
We’ve put together a little how-to guide to help you help local businesses get found on Bing Places. Let’s start with the basics.
Creating and Claiming a Bing Places Listing
The first step in getting businesses found online is to check for any existing listings. Bing most likely already has a listing for the business, in which case the listing needs to be claimed.
If for any reason the business you’re looking for doesn’t have a listing yet, then you can easily make one by creating an account. Don’t worry: you don’t have to be the business owner. You can just be a verified representative. Multiple locations are covered by Bing’s bulk upload tool.

When you create a new user, Bing allows you to import your information directly from Google Business Profile (formerly Google My Business) – very convenient! If the business you’re trying to get listed doesn’t have a Google Business Profile (GBP) listing, you can also add the information manually.
For the purposes of this guide, let’s assume that this particular business doesn’t have a GBP listing, so we’ll start from scratch.
Step 1. Select business type. Here you’ll be asked to choose a business size depending on the number of locations it has. The options are small or medium business, chain business or online business. You can also choose the option “I manage business listings on my client’s behalf,” which is what an agency working with multiple clients would select.
Selecting the last option immediately prompts a pop-up for the Bing Places API. Bing Places has its own API and lets you check if your agency is eligible for their trusted partner program. To be eligible, your agency needs to manage more than 10,000 listings for clients and have strict data quality checks.
If your agency is not eligible for Bing’s program, you can still create a regular agency account. We are part of Bing’s trusted partner program and submit to Bing Places via API, so don’t worry, we have you covered if you partner with us.
Step 2. Create an account. You can do this with your Google, Facebook or Microsoft account. If you want to create a specific account for just for this process, you can do that, too.
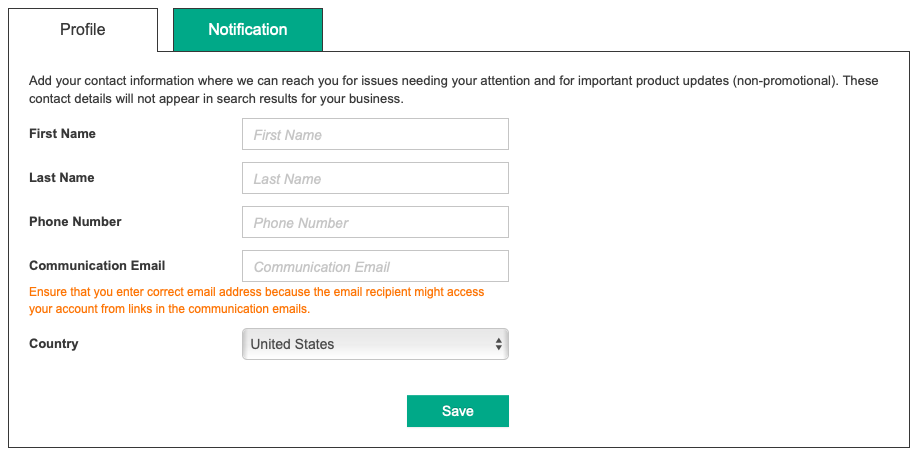
Step 3. Create a profile. Fill out your contact information and select your notification options.
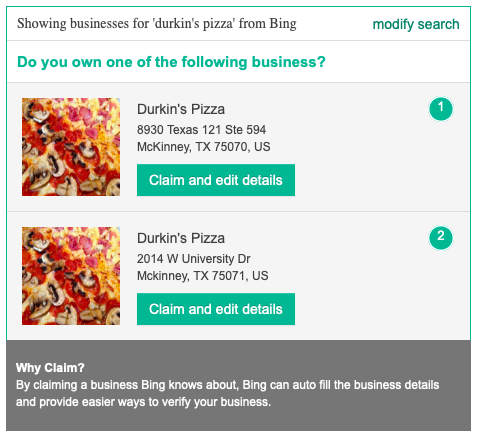
Step 4. Search for the business. You can hunt for the business by using a phone number or a business name and location.
If the business you searched for already has a Bing Places listing, you can claim it and edit the details.
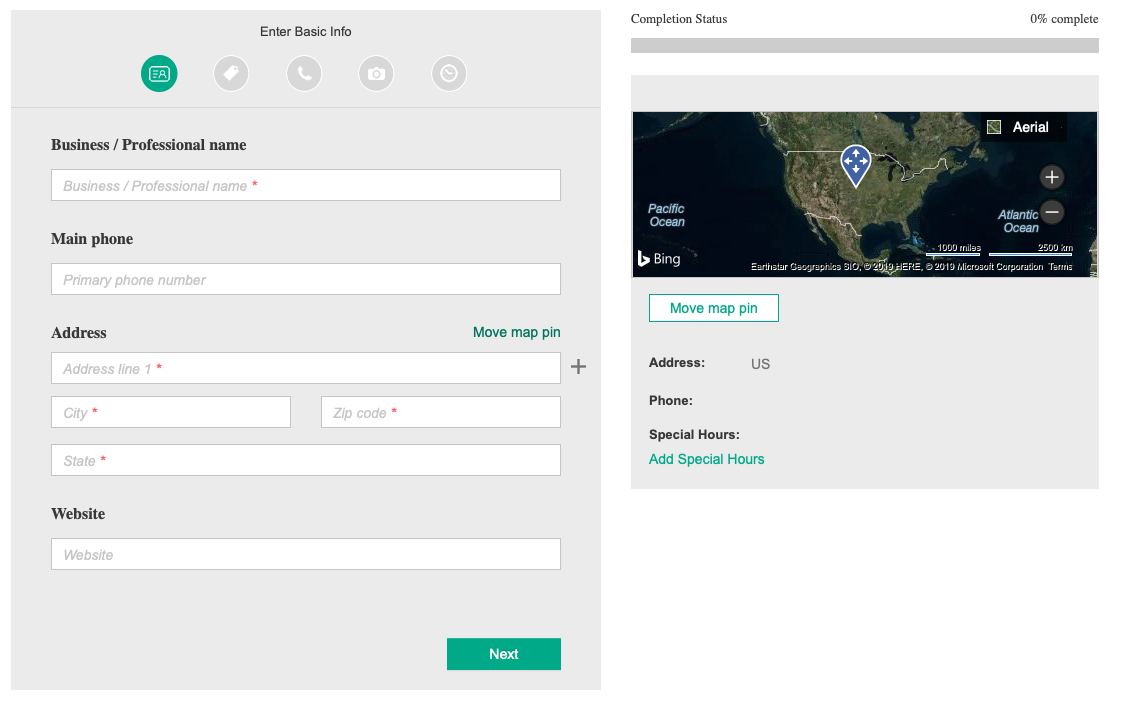
Step 5. If the business is not already on Bing, you can create the listing from scratch. To create a listing, enter basic information like the business’ name, phone number, address and website. As you type, you will see a preview of the listing on the right side of the screen.
The next section asks questions about the nature of the business. It will let you choose a segment, add up to ten categories and enter a description. Be as descriptive as possible, but not too wordy. If you select more than one category, it will ask you to pick your main business type.
Afterward, you’ll be asked to enter service areas, if there are any. In this section, you can choose to hide the address of the business, in case it’s a home address. Following the service areas, you will be prompted to enter contact details, like an email address, as well as social media profiles (all of which are optional).
Step 6. Add images. Bing Places allows up to 100 different photos, so make sure you utilize the opportunity! To have an outstanding listing, take the following tips into consideration when uploading photos.
- Use high quality and high-resolution images.
- Show different aspects of the business – the exterior and the interior.
- Display the exterior from different angles so potential customers can find it easily.
- Highlight team members. People like to see who they will potentially deal with when going into a business.
- Upload professional product images. Lure customers in with a great shot of the products you offer.
According to Bing’s image guidelines, images must be at least 480×360 pixels and up to 10MB.
Step 7. Set business hours. Bing Places gives you an option to provide working hours for special days, like weekends and holidays. Make sure you fill it out correctly!
Step 8. Verify the listing. Take the time to verify the listing to protect it from unauthorized changes. The verification process can be done via postal mail, an email, a text message or a phone call.
If you have optimized a Google Business Profile listing before, you most likely can accomplish creating a Bing Places listing easily. If you haven’t or want even more insights into business listing optimization, here’s a helpful how-to.
Leave It to the Experts
Managing multiple listings can be overwhelming, but don’t worry. Our award-winning listing management solution is exactly what you need to provide stress-free high-quality local SEO services to your clients. Request a demo today to see how we help businesses like your clients get found online every day.